Saturday, June 29, 2013

Cupcake Onesies

 So as I was browsing Pinterest I stumbled upon Cupcake Onesies. I pinned it of course and decided to come back to it one day I needed a super awesome Baby Shower gift. Here is the original pins website has been blocked, but here is the link to the pin: http://pinterest.com/pin/91690542385433781/


After reviewing the steps just from the picture I set out to find a cupcake box. I didn't have a lot of luck with this, most of the boxes were expensive or you had to buy them in bulk. I finally found a cake pan tin at Michaels for $4. I decided to go with this one. To fill up the cake tin I had to have 12 onesies. This is relatively easy considering onesies normally come in packs of 3-4. For this gift I decided to get the onesies in various sizes from NB-12 months. Knowing what I know now its a  lot easier to roll thin onesies and onesies without decorations on them. The seem to roll up nicer into a cupcake, but the other ones turn out okay. Below I included step by step directions with pictures.


Lay the onesie flat and then fold it three times to make it look like Step 2 picture. Then fold the piece in half like Step 3 picture so the top of the onesie meets the bottom of the onesie. 


Then roll the onesie by rolling the top/bottom pieces inside the "cupcake". This way it will hid the buttons and tag. Once you roll up the onesie secure it with rubber band. 


Then place a JUMBO cupcake holder over the onesie securing it with a rubber band. After that step is completed I wrapped ribbon around the rubber band to cover it up and make it look "pretty". :) Place a bow on top and then you have successfully "baked" cupcake onesies.


This gift was a huge success with everyone super complimentary of my pinterest talents! 


Wednesday, June 26, 2013

Wine Bottle Vases

I had to throw together last minute decorations for an engagement party my boyfriend was throwing. I had seen multiple decorations on  Pinterest using wine bottles, but no in particular pin sticks out in my mind. Fortunately I have been saving wine bottles for several months for no reason other than to eventually to recycle them, but suddenly they were of great use to me. 

Materials Needed
Painters Tape
Cotton Balls
Krylon Spray Paint (any spray paint will work)
Wine Bottles

First: I soaked the wine bottles in water, and scraped the labels off with a butter knife. Of course the label didn't come off as planned so it require more vigorously scrubbing with a dish brush and soap.
After I completely removed the label I decided which bottles were going to have design or be solid. I then put painters tape in a design on the wine bottle. I bought my painters tape from Wal-Mart, and it was the cheapest brand.
The next step was putting a cotton ball in the top of the wine bottle to prevent spray paint from spraying down in the bottle. 
After this was completed I started the painting. With the red wine bottles I sprayed them once really well and  let them dry for a couple hours and then sprayed a final coat. With the rainbow bottles I sprayed a primer and then sprayed the top coat color (two coats). I can't  honestly say one works better than the other. The primer was black so the inside of the wine bottle shows black paint verses the red bottles show red paint inside. It's whatever you chose to do. 

The final step was removing the tape. Be extremely careful the tape can rip the paint off the glass, but after its all removed you will have beautiful vases! 

These vases are in my classroom with pipe cleaner flowers made by the kids!


These wine bottles were used as decorations for the engagement party! The solid bottles I wrapped twine around them to give them a little extra! They were a huge success and a quick, cheap vase for beautiful flowers! :) 


Monday, June 24, 2013

Strawberry Volcanoes

What a yummy way to make strawberries, chocolate, and whipped cream educational! This week we were focusing on Dinosaurs, and of course volcanoes got thrown into the mix! So I started browsing Pinterest for volcano projects. Obviously we have exhausted the whole vinegar/baking soda experiment so it was time to get creative! So I stumbled upon a "Strawberry Volcano" pin! Here is the link to the blog with their version of Strawberries Volcanoes.

http://www.showfoodchef.com/2010/07/strawberry-volcano-for-my-blog-versary.html

As wonderful as this blog's reciepe was....I had to simplify it! I work with kids, and on a budget. All you need to complete this delicious art work is Hershey Hot Fudge Topping, 1 Can of Whipped Cream, and 2 packs of fresh strawberries. 

We heated the hot fudge in the microwave for 1-2 mins until it was warm to touch. I had the kids pull off the green steams and then dip the bottom of the strawberry in the chocolate! After we swirled whipped cream on top of of the strawberry then boom STRAWBERRY VOLCANOES! :)

Cafe a la Mud

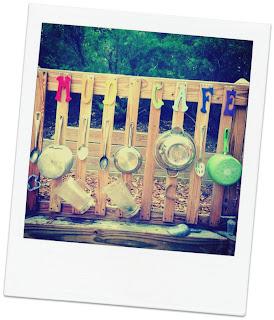
As a long term Pinterest project I started developing a Mud Cafe for my school age classroom. I made this Mud Cafe for the low price of 10 dollars. Yes, I did already have the structure to start the cafe, but all of the pots/pans/utensils were donated from friends and family. All I did was advertise on my Facebook I was creating this "cafe" and the donations rolled in.

Here was stage one of the Mud Cafe:

After we completed Stage One I posted my progress on Facebook and more donations rolled in. We later added more pieces of the Mud Cafe.

Stage Two of Mud Cafe:

After this point everything is pretty much polished off except for one final finishing touch...
 

Lets just say the Mud Cafe has been a huge hit with the kids! There is nothing more important in a teacher's role than to spark creativity and enhance the learning spaces for children!


Saturday, June 22, 2013

Build-a-Library Baby Shower

I had the privilege of throwing a baby shower with some of my best friends for of our dearest friends. After hours of browsing Pinterest I was determined to throw her a Build-a-Library shower! How unique and how precious?

First, as any party planner does, we started with FOOD! I stumbled upon really great food ideas from Pinterest so we picked our favorites and made them our own! The menu consisted of


One Fish, Two Fish, Red Fish, Blue Fish--Rainbow Goldfish


"Goodnight Moon-Moon Pies"


 "Cloudy with a Chance of Meatballs-BBQ Meatballs"


"Pinkalicious Pink Lemonade"


Green Deviled Eggs & Ham Sandwiches


"If you give a Mouse a Cookie-Chocolate Chip Cookies & Oreos"


The party favor was gummy worms in a small bag. The tag reads "Thank you for coming, celebrating, and bringing a book to confirm that little Ansley will truly become a precious bookworm."


Pinterest is always the saving grace for shower activities so I found the "Create an ABC Book" game.  This gave the group an opportunity to "rehabilitate" their creativity and draw pictures that coordinate with the alphabet letter. . This was truly a very special baby shower full of love and literacy! Little miss Ansley will enter the world with 85 children's books that she will hopefully one day read to her children. 

If you have any specific questions feel free to contact me!

Book Page Garland


All of the "Lit Decor" posts are leading up to the baby shower a few of us organized for one of my dearest friends. This is what I call the "Book Page Banner". I originally saw this craft on Pinterest and this link actually gave amazing instructions to complete this lovely decor. 
Below is the link to the blog with step by step instructions to make this lovely garland. Above of course is the "Book Page Garland" I completed with sweet "Ansley's" name as my inspiration. 

Literature Decor


A twist on typical tissue decor balls is what I would call this craft! This was created original for a baby shower, which I will post about at a later time! :) This was one of those crafts on Pinterest that had little or no instructions so I had to become resourceful with this one. I first gathered old books obviously. :) After some trail and error I finally decided to go with floral pins to pin the book pages into a medium styro foam ball. Each book page ball took for about 3-4 hours. I clearly underestimated how much time it would actually take. Here are the step by step directions! Happy Crafting!

Materials Needed:
Styro Foam Balls (Medium)
Foral U-Pins (4 boxes of 50 pieces)
Old Book with at least 200 pages

First Step: Tear out book pages carefully then roll the book pages into tight rolls. 
Second Step: Fold the rolled book page over the "U-Pin" in the middle of the book page roll. 
Third Step: Push the "U-Pin" with the roll folded into the styro foam ball.
Fourth Step: Continue to push in the pins with book pages all over the ball until you can't see any of the ball and its completely covered! 

*In order to get my "Lit Decor" to hang I took one "U-Pin" tied fishing line to the pin. Then pushed the pin down into the ball while putting hot glue on top of the pin and all around it. This secured it enough to hang it. 


North Carolina String Art


I always pin really awesome crafts that I can complete with little or no costs. This project was inspired by the several pins you will find all over Pinterest called "string art". I completed this project with one of my after school kids over about a 3 hour time period. We first pick a piece of scrap wood big enough to complete our work. I fortunately had scrap wood donated to my classroom in the previous months. We then googled the outline of our wonderful state. The next step was to trace North Carolina onto the scrap wood so we used an overhead projector to enlarge the image on the wood.  Afterwards, we carefully traced the state of NC. After the image was traced we drew a heart at the center of Raleigh. After the image was traced onto the the piece of wood the rest was nothing but stress relief! Bit by Bit we placed the nails along the outline and hammered each one in. After all the nails were in place we then picked three different color string to lace within nails. Instead of going with one color we chose three different colors to represent the different geological regions of this wonderful state, Coastal, Piedmont, and Mountains. We plan to submit it to the Hobbies & Crafts of the North Carolina State Fair this coming year!